ew places on Earth offer the photographic drama of Kenya’s Masai Mara. From a lion’s golden mane in the sunrise light to wildebeest stampedes across muddy rivers, the Mara is a visual paradise for professional and amateur photographers alike.
At Woodsly Adventures, we design safaris with photography in mind — giving you the angles, guides, and schedules needed to return home with breathtaking images.
In this guide, we’ll share our top Masai Mara photography tips, gear advice, and techniques to help you capture the raw beauty of the African wilderness.
1. Choose the Right Time of Year
Best Photography Seasons:
-
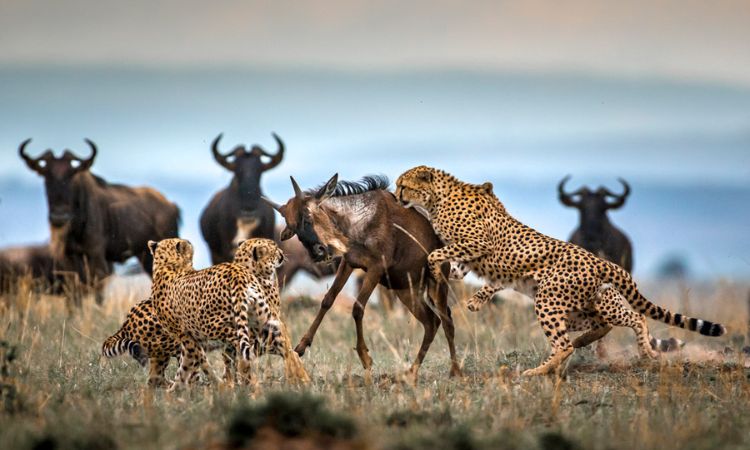
July–October: Great Migration season. Capture wildebeest crossings, predator action, and epic dust trails.
-
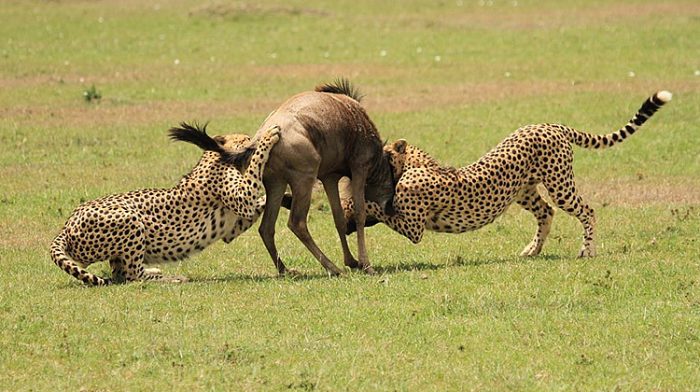
January–March: Calving season. Expect newborn animals, dramatic predator-prey interactions, and clear skies.
-
April–May: Green season. Lush landscapes, fewer crowds, and vibrant birdlife — perfect for color-rich shots.
📌 Pro Tip: The light in the Mara is softest at sunrise and sunset. Plan most of your shooting during these golden hours.
2. Use the Right Gear
While great photos can be taken with most modern cameras, safari photography is best with DSLR or mirrorless cameras and zoom lenses.
Recommended Kit:
-
Camera Body: Any DSLR or mirrorless with fast autofocus and good low-light performance (e.g., Canon R6, Nikon Z6, Sony A7III).
-
Lens 1: 100–400mm or 200–600mm for wildlife close-ups.
-
Lens 2: 24–70mm for landscape and vehicle shots.
-
Lens 3 (optional): Wide-angle 16–35mm for sunrise and dramatic skies.
-
Accessories:
-
Extra batteries & memory cards
-
Lens cleaning cloth
-
Bean bag (to stabilize shots in vehicle)
-
Polarizing filter for vibrant skies
-
Don’t have pro gear? No problem. Woodsly Adventures can arrange lens rentals or recommend budget-friendly cameras that deliver excellent safari results.
3. Work with a Safari Guide Who Understands Photography
Not all guides are created equal — a safari guide with photography training makes a huge difference.
At Woodsly Adventures, we partner with expert driver-guides who:
-
Know how to position the vehicle for perfect light
-
Understand animal behavior for anticipating shots
-
Respect photographic silence and patience
-
Avoid crowding animals or blocking other photographers
Whether you’re shooting from a pop-top Land Cruiser or on foot in private conservancies, your guide can help you be in the right place at the right time.
4. Understand Light and Shadows
Golden Hours
-
Sunrise: Soft, warm light. Great for portraits and backlit animals.
-
Sunset: Ideal for silhouettes, warm tones, and dynamic contrast.
Midday Light
Harsh and flat. Use it for behavioral photography (predator kills, crossings) when drama trumps aesthetics. Overcast days are surprisingly good for saturated colors and eliminating shadows.
📌 Pro Tip: Don’t always zoom in. Sometimes the best photo is the full scene — a lone cheetah on the plains, or elephants dwarfed by a stormy sky.
5. Focus on the Eyes
In wildlife photography, sharp eyes = strong emotional connection. Always focus on the animal’s eyes, even if they’re in motion.
Camera Settings Tip:
-
Use continuous autofocus (AI Servo / AF-C)
-
Set a high enough shutter speed (1/1000 or faster for moving animals)
-
Use burst mode to capture sequences (helpful during action)
6. Think Beyond the Big Five
Everyone wants lions, elephants, rhinos, leopards, and buffalo — but the Mara offers so much more:
-
Cheetahs hunting in golden grass
-
Lilac-breasted rollers mid-flight
-
Masai herders in traditional red shukas
-
Rainstorms sweeping across the savannah
Tell a story with your photos — mix close-ups, landscape scenes, people, and movement.
7. Be Patient
The Mara rewards those who wait.
-
Wait for a yawn, a stare, or a leap
-
Stick with a subject for longer (e.g., a lion pride waking up)
-
Predict behavior based on movement or sound
If you’re on a private safari with Woodsly Adventures, we’ll tailor your schedule for patient photography instead of rushing from one sighting to the next.
8. Combine Destinations for Photo Variety
Want more diversity in your safari portfolio?
Combine your Masai Mara safari with:
-
Tsavo National Park – dramatic volcanic terrain, red elephants, and baobab trees
-
Wasini Island Marine Park Excursion – underwater coral gardens, dolphins, and dhow sailing shots
This creates a dynamic photo album: wildlife, landscapes, culture, and coastline.
9. Respect Wildlife and Ethical Practices
-
Never ask your guide to get too close or chase animals
-
Don’t disturb nesting birds or sleeping predators
-
Avoid flash at night or near sensitive animals
-
Share your best photos with awareness and conservation in mind
At Woodsly Adventures, we prioritize ethical safari guiding and low-impact travel. We believe great photos come from respect and patience—not interference.
10. Post-Processing and Sharing
Editing your photos brings out their full potential. Tools like Adobe Lightroom, Capture One, or Luminar allow you to:
-
Adjust contrast, sharpness, and white balance
-
Crop for stronger composition
-
Apply noise reduction for high ISO shots
📌 Pro Tip: Don’t over-edit. Keep your colors natural and your contrast realistic for images that feel true to the moment.
When you’re ready to share, tag @woodslyadventures on Instagram or send us your favorites — we love showcasing client photography (with credit) in our newsletters and social feeds.
Final Thoughts
Photography in the Masai Mara is more than capturing animals — it’s about translating emotion, scale, and wild beauty into an image. Whether you’re a hobbyist with a zoom lens or a professional with a full kit, the Mara will challenge and reward you in equal measure.
Let Woodsly Adventures help you craft a custom photography safari with perfect timing, ideal guides, and the right lodges. Our team knows the best locations for sunrise, the cleanest vehicles for shooting, and the flexibility photographers need to get “the shot.”
Start here:
📸 Masai Mara Safari – Book Now